
🔍 What You’ll Learn
- Initial setup and configuration of a Cisco switch
- Configuring VLANs and assigning interfaces
- Securing access to the switch
- Verifying and saving configurations
📌 Step 1: Initial Setup and Access to the Switch
Before configuring your switch, connect to it via the console port using a terminal emulator like PuTTY or Tera Term. Use the following settings:
- Baud Rate: 9600
- Data Bits: 8
- Parity: None
- Stop Bits: 1
- Flow Control: None
Once connected, follow these steps to enter privileged EXEC mode:
Switch> enable

Switch#
📌 Step 2: Basic Switch Configuration
🛠 Set a Hostname
Giving your switch a meaningful name helps with identification.
Switch# configure terminal

Switch(config)# hostname CoreSwitch

CoreSwitch(config)#
🛠 Configure a Management Interface (VLAN 1)
Set an IP address for the switch’s management interface to enable remote access.
CoreSwitch(config)# interface vlan 1

CoreSwitch(config-if)# ip address 192.168.1.2 255.255.255.0

CoreSwitch(config-if)# no shutdown
Ensure the switch is connected to the correct subnet for remote management.
🛠 Configure Default Gateway
Set the default gateway for the management network.
CoreSwitch(config)# ip default-gateway 192.168.1.1
📌 Step 3: VLAN Configuration
A Virtual Local Area Network (VLAN) segments the network into different broadcast domains for better security and performance.
🛠 Create VLANs and Assign Interfaces
CoreSwitch(config)# vlan 10

CoreSwitch(config-vlan)# name Sales

CoreSwitch(config-vlan)# exitCoreSwitch(config-vlan)# name IT
CoreSwitch(config-vlan)# exit
Assign interfaces to VLANs:
CoreSwitch(config)# interface FastEthernet0/1

CoreSwitch(config-if)# switchport mode access

CoreSwitch(config-if)# switchport access vlan 10

CoreSwitch(config-if)# exitCoreSwitch(config-if)# switchport mode access
CoreSwitch(config-if)# switchport access vlan 20
CoreSwitch(config-if)# exit
📌 Step 4: Secure Access to the Switch
🛡️ Configure Console and VTY Passwords
CoreSwitch(config)# line console 0

CoreSwitch(config-line)# password cisco123

CoreSwitch(config-line)# login

CoreSwitch(config-line)# exitCoreSwitch(config-line)# password cisco123
CoreSwitch(config-line)# login
CoreSwitch(config-line)# exit
🛡️ Enable SSH for Remote Access
CoreSwitch(config)# ip domain-name example.com

CoreSwitch(config)# crypto key generate rsa

The name for the keys will be: CoreSwitch.example.com

Choose the size of the key modulus (512 to 4096): 2048CoreSwitch(config)# username admin privilege 15 secret adminpass123
📌 Step 5: Save Configuration and Verify
To save your configuration so it persists after a reboot:
CoreSwitch# copy running-config startup-config
Verify your configuration:
CoreSwitch# show running-config
📊 Example Network Diagram
Here’s a simple network diagram for your switch setup:
Diagram:
- VLAN 10 (Sales): 192.168.10.0/24
- VLAN 20 (IT): 192.168.20.0/24
- Management IP: 192.168.1.2/24
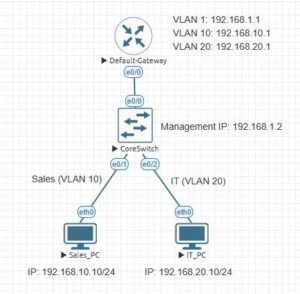
Here’s a simple network diagram illustrating the basic Cisco switch configuration described in this post. It visually represents the VLAN setup, management IP, and device connections for better understanding.
🎯 Final Thoughts
Configuring a Cisco switch may seem challenging at first, but once you understand the basics, it becomes easier. By following this guide, you’ll be able to set up VLANs, secure your switch, and manage it remotely.
Stay tuned for more advanced switch configuration guides and tips on Packet-Switched.com! 🚀